Email Document
Each email composed in SerialMailer is a separate document that contains the recipient list as well as the message text and attachments. To create a new email, choose New from the File menu, or press the New Mail button in the Recipient Lists window.
The document window has multiple sections with the Recipients list, Message, Attachments, Preview and Log.
Recipients
The Recipients section lists the addresses to which the email will be sent.
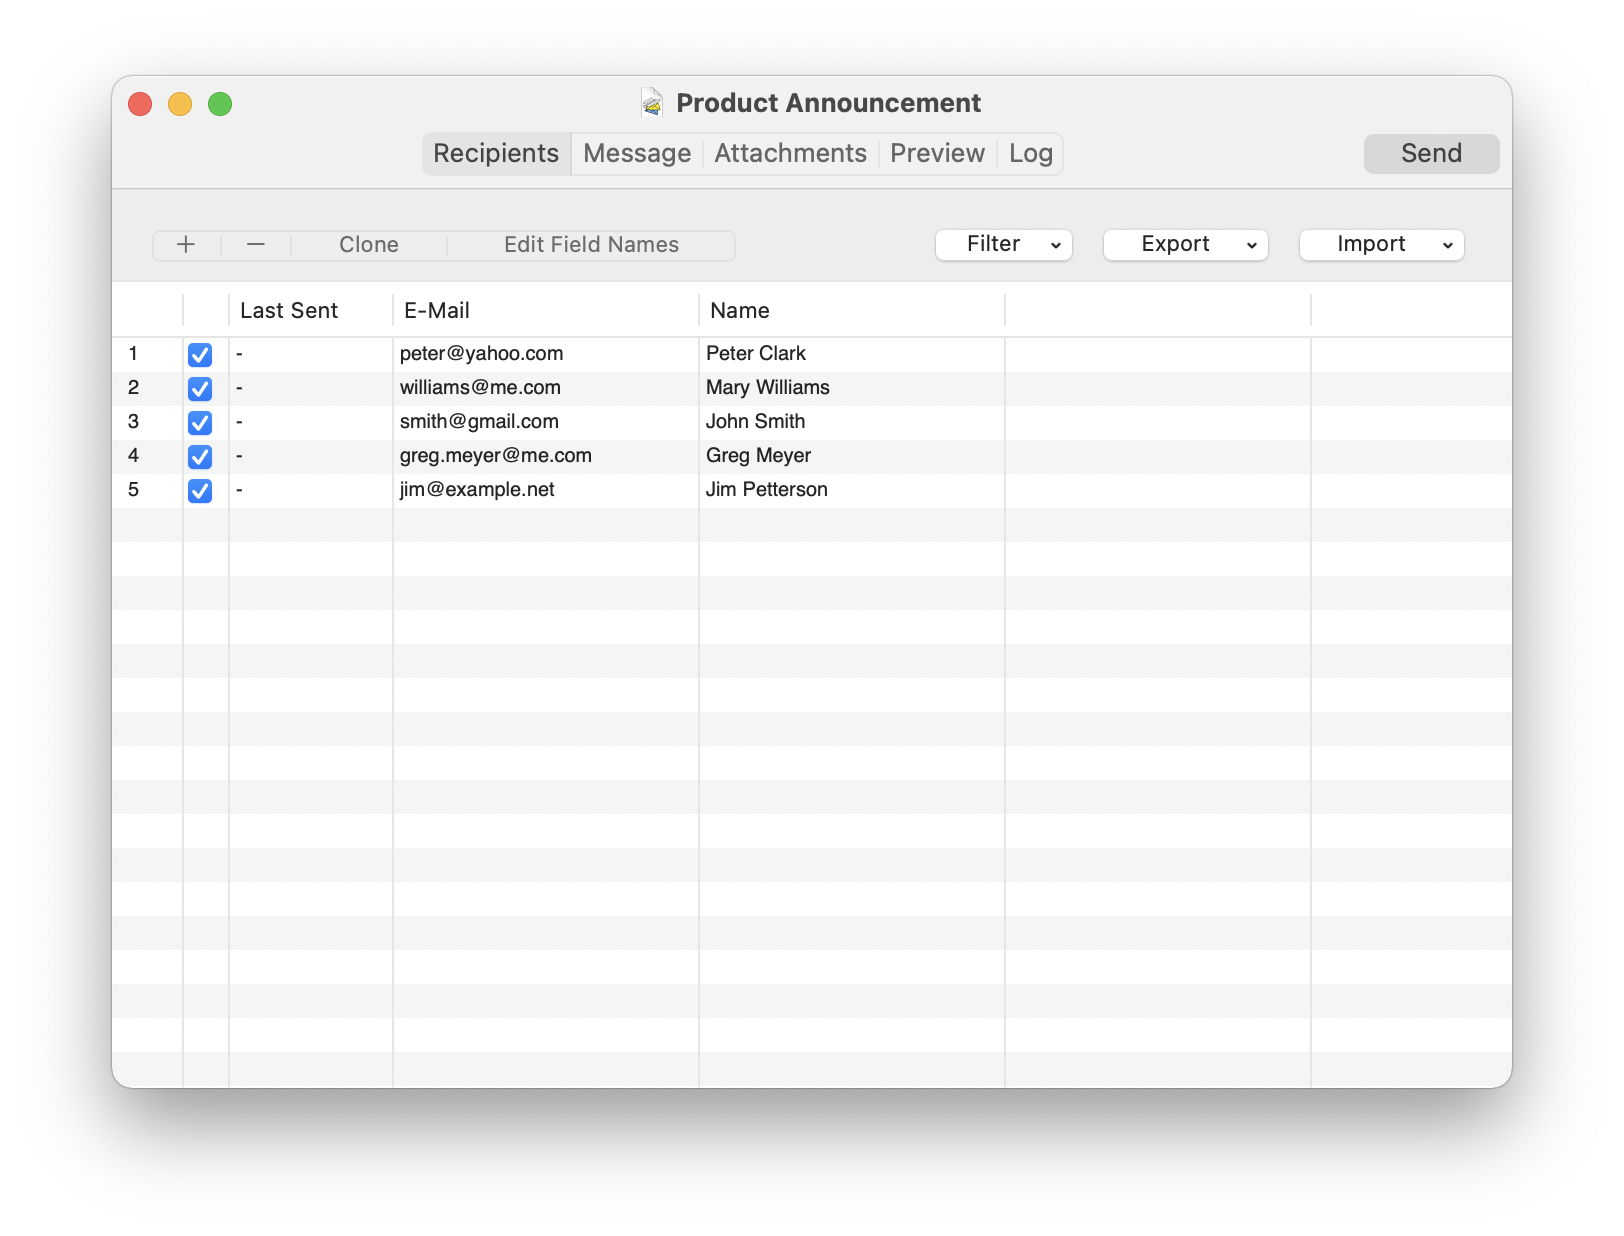
You can add lists from the Recipient Lists window by dragging them into the recipient list in your email document.
Addresses can be enabled and disabled using the checkbox in the second column. Use the filter commands above the list to change the state of multiple entries at once.
The Last Sent column lists the date on which the email was sent to that recipient.
The list can be sorted by double-clicking on one of the column headers.
Message Editor
In the message editor, you specify the recipient of the email, edit the subject, and the main email text. You can also insert placeholders for fields from the recipient list to personalize the message.

Recipient Address
In the To menu, you can set which of the columns in the recipient list is used as the email address the mail is sent to.
As an additional option, you can choose Multiple…. This will reveal a text field where you can enter a comma-separated list of addresses. These addresses can also be built out of fields/columns from the recipient list. To insert a field, use the Insert Field menu, just as you do when inserting fields into the message.
Just like the main recipient, you can add CC (Carbon Copy) addresses using the CC menu. If this is not needed, you can leave the CC menu on its default setting None.
Caution
When using Multiple…, it is important to make sure that the email addresses are separated by a comma. Just inserting multiple fields after one another would concatenate the addresses, forming an incorrect and malformed email address.
Personalization
To insert a field/column from the recipient list, insert a field in the subject line or the message body using the Insert Field menu at the top.
More complex fields are available from the Special Fields menu.
Smart Field
A Smart Field can be inserted via the Special Fields menu. It changes its text depending on the content of other fields. The conditions are tested in the order in which they are found in the list and once a condition is true, its contents will be inserted and all other conditions ignored.
An ‘else’ case, which should be used if none of the other conditions are met, is not available. However, you can add a condition which will always be true at the end of the list as a workaround. This could be something like ‘If the field name is not xyzabcnoname’.
You could use ‘Smart Fields’ to automatically adjust the greeting line to the gender of the recipient:

The field can be edited by clicking on its placeholder box in the message view.
Formatting Options
- Plain Text
This is the most basic option. You cannot insert images or change the font style. It is most compatible with all email clients available.
- Formatted Text
With this option, you can format your message. You can insert images, tables, lists and links.
For a detailed guide on formatting your message, see Writing Formatted Messages.
- Template
You can use a design template / stationery. The editor will behave the same way as when using formatted text, but the preview will show that your text is embedded in a more complex design.
You can create your own design templates based on HTML pages and install them in SerialMailer’s preferences.
- Treat Text as HTML-Code
This mode is most suited for experts. You can create and import raw HTML pages. To insert images use the HTML Embedded File from the Special Fields menu. This field will take care of attaching the given file and creating a file path / URL that points to the attachment.
An image tag in the HTML code would then look like this:
<img src="[HTML Embedded File]">
You can use the buttons at the top to switch between the plain text and the HTML version of the email.
Importing HTML
SerialMailer can import an HTML document (webpage) into the editor. This will not only place the code into the editor and switch to Treat Text as HTML-Code mode, but also try to resolve and attach all resources/images used in the page.
Since SerialMailer needs access to all associated files, you have to select the folder that contains the HTML page and all its resources, rather than just the HTML page itself. Once this is done, a window opens that allows you to select the page’s text encoding and that shows all resources detected in the HTML.
If a resource was not found, you can press the Select File button to select a file manually.
Attachments
As with any normal email client, you can add attachments to your email. SerialMailer, however, not only supports plain files that are attached to every email, but also personalized attachments. With personalized attachments, the attached files can change depending on the recipient.
To add a normal file, choose Plain File from the + menu at the top.
Personalized Attachments
When adding a Personalized attachment via the + menu, SerialMailer can choose a different file for each recipient.
The files from which SerialMailer can choose will have to be stored in a common folder, the “Root” folder.
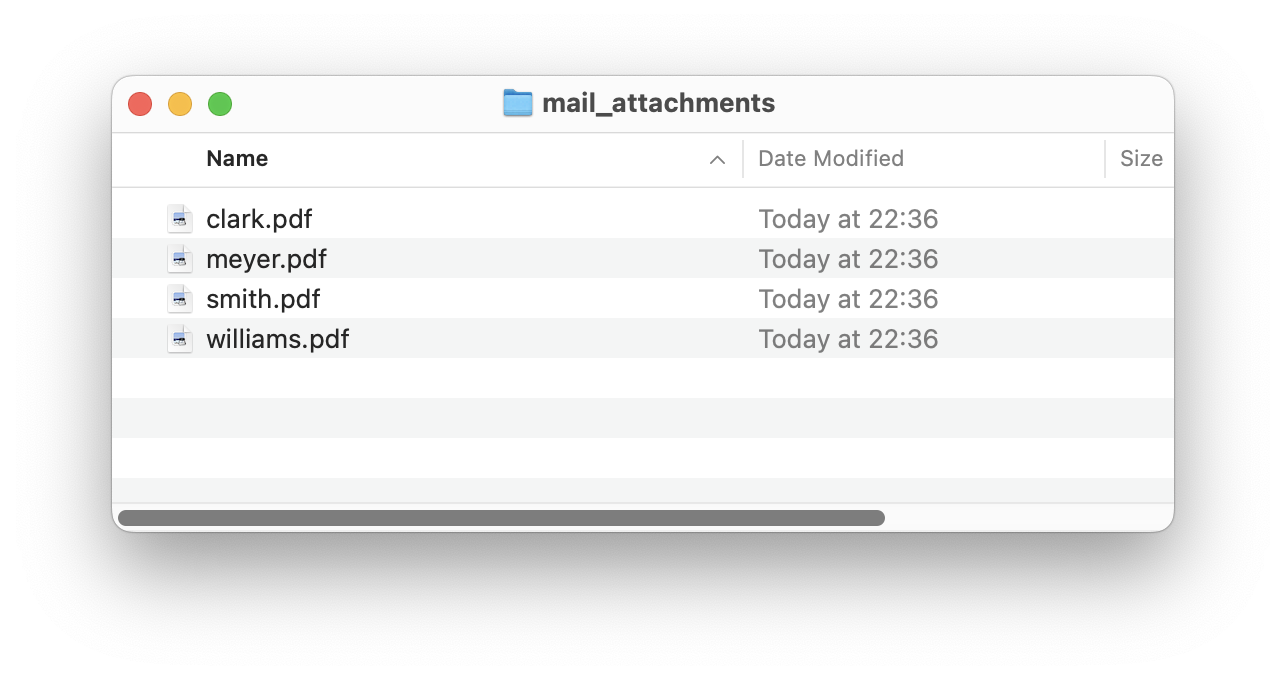
As an example, let’s assume your root folder, containing a special file for some recipients, looks like this:
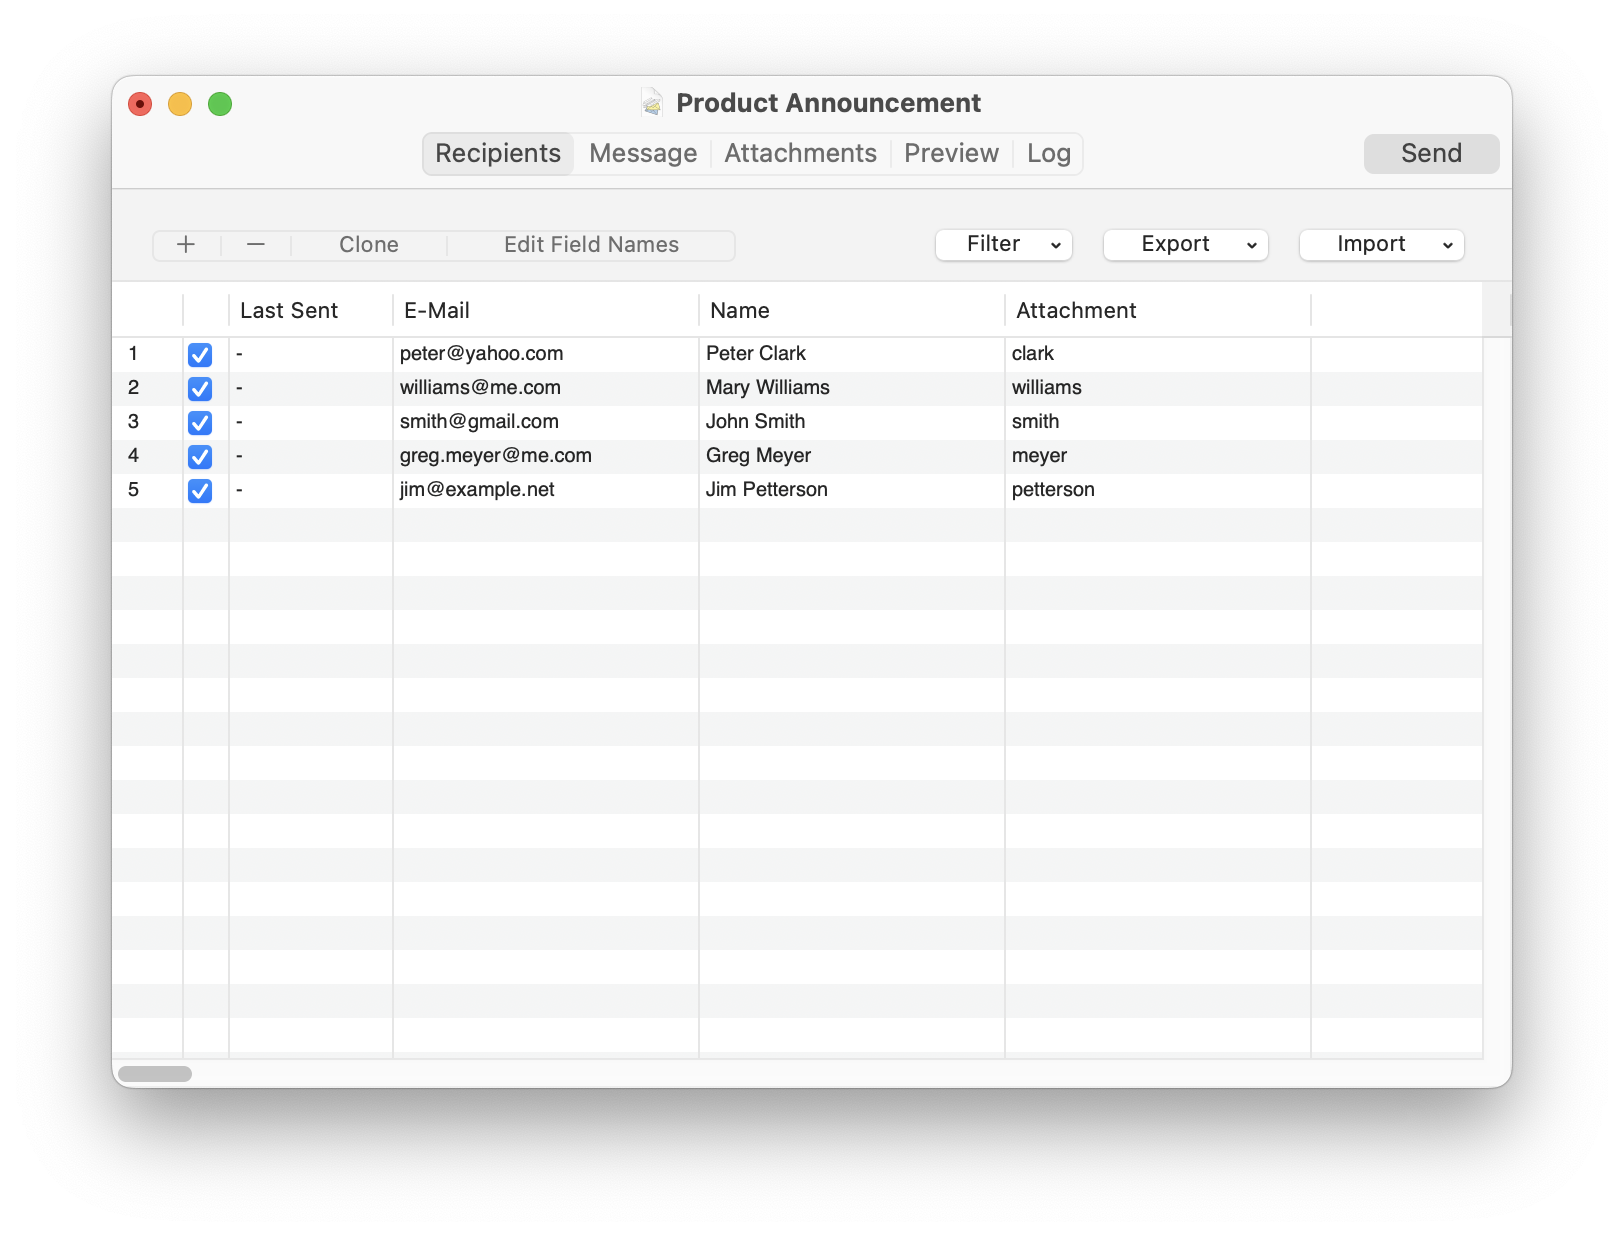
And your recipients list looks like this, with a special column “Attachment” that we will use to decide which file to attach:
You can now go to the attachment tab and insert a personalized attachment by choosing “Personalized” from the + menu above the list.
This will open the editor for the attachment:

As the first step, press the “Set” button to select the root folder, which is the one that contains all your files.
SerialMailer does not yet know which file to choose from the folder for a given recipient. To fix this, SerialMailer has to be given a “File Name”. This file name is then the file that SerialMailer will search for in the root folder. With the “Insert Field” menu, you can personalize the “File Name” for each recipient and thus send different files.
Remember that we used the column called “Attachment” in our recipient list to identify which file we want to send. So to tell SerialMailer to look for a file called “clark.pdf” when sending an email to “Peter Clark”, we first insert the “Attachment” field as a placeholder for the content of that column (using the “Insert Field” menu) and then add the “.pdf” file ending.
This tells SerialMailer that for each email it sends, it should take what is in the “Attachment” column, append “.pdf” and then find the file with that name in the root folder.
At the bottom of the attachment editor, you can tell SerialMailer what to do if it cannot find a file for a given name. As you might have noticed, there is no “petterson” file in our example folder. This is because we just don’t want to send any file to him while still sending the rest of the email. Thus we tell SerialMailer to just “Send the mail without the attachment”.
Now click “Ok” to leave the editor and use the “Preview” tab to make sure that everything works as expected. If an attachment cannot be found, its name will be highlighted in red.
If you want to edit the attachment at a later time, you can go back to the “Attachments” tab and double-click the entry in the list.
Sending the emails
Once you have added all recipients to the database and composed your message, you can send the emails by pressing the Send button at the top of the document window. This opens a window with several options.

- Email Account menu
Select the email account which SerialMailer should use to send the emails.
- BCC field
You can enter a comma-separated list of email addresses that will receive a copy of every email sent. This is especially useful if you would like to receive a copy of every email at your own address to keep track of the emails sent.
- Send to menu
You can specify a list of test addresses (taken from My Lists in the Recipient Lists window) or simulate sending as a dry-run. When Recipient List is selected, the email will be sent to the actual recipients in the list of the email document.
Test Recipients allows you to send your email to a small group of test addresses instead of your main recipient list. This is highly recommended for testing your email formatting, personalization, and attachments before sending to your entire audience.
Nobody (dry run) simulates the sending process without actually sending any emails. This helps you verify which recipients would receive emails and identify potential issues.
For detailed information on creating and using test lists, see Test Lists.
Press the Send button to send the emails. This will also open a progress window. You can abort the send process in two stages using the Cancel button. If you only press it once, SerialMailer will stop after the current email has been dispatched. The program will stop immediately after a second click.